The Skelta Workflow.NET Activity List web form is the user interface where the resources in a workflow can view the activities assigned to them and take necessary action. It opens when the Activity List control is executed from the Web Application. The activities will be displayed for the resource currently logged in. The displayed activities can be sorted on the basis of different parameters.
The appearance of the Activity List can be customized. Colors are managed by styles sheets and can be changed at any point of time. HTML files are maintained which can be edited to change the look and feel of the controls according to need.
The Activity List user interface has five main elements –
These are described in separate sections. The
Activity List screen shown here has two actions. The Activity Detailed View
displays the detailed view for the selected activity.
Activity List
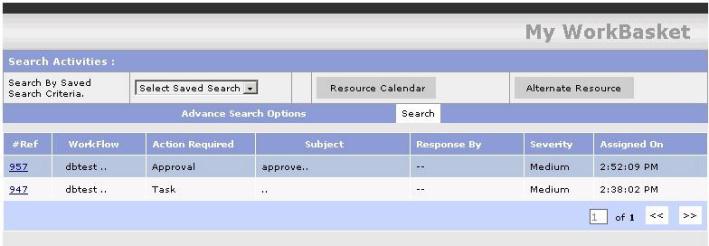
Activity List Table
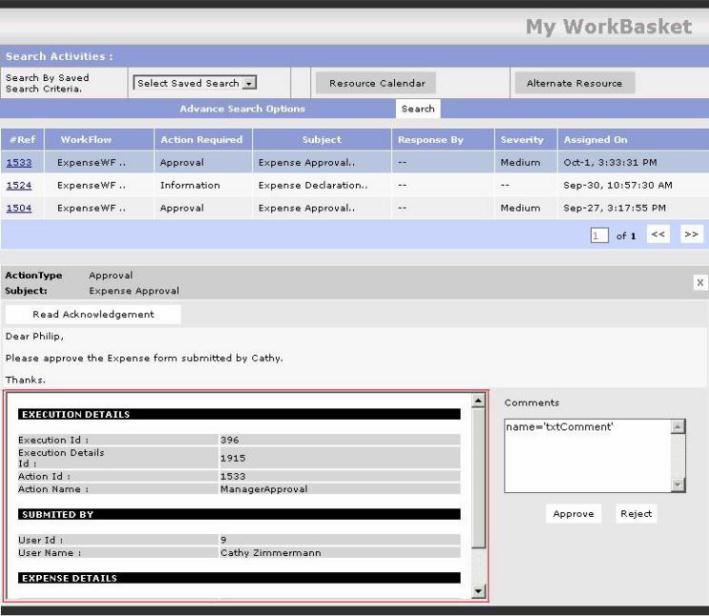
The Activity List Table is the main element in the Activity List screen. It displays a list of all activities assigned to the resource. You can click on any activity to view a detailed display of that activity. The activities are removed from the list when the resource performs the required actions. There is a provision to navigate across pages when more than one page is required to display the list of activities. The table has the following columns:
You can click on any of these column heads other than #Ref to sort the actions by that parameter.

Search Activity
You can search for activities by specifying search criteria here. You can select a saved search criteria from the Search By Saved Search Critera drop down.
You can also do an advanced search by clicking on the Advanced Search Options link at the lower left. This displays several fields and drop downs where different search parameters can be specified. There are the Workitem ref# and Summary fields. In addition there are five selectors – Action Required, Assigned By, Severity, Workflow Type and Assigned Between. The first four open drop downs with a set of options for the respective parameter. The last, Assigned Between, has two sets of three drop downs, to select the day, month and year for the start and end of the period in which to search for assigned activities.

Advanced Search
Resource Calendar
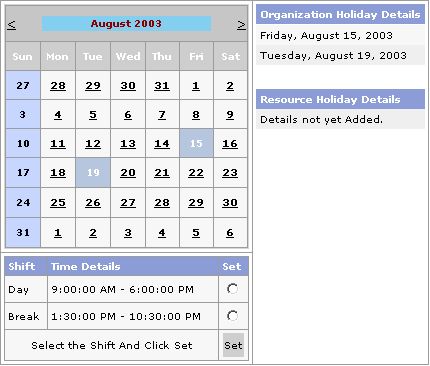
You can click the Resource Calendar button at the top of the Activity List screen to view the Resource Calendar screen, which opens in a separate browser window. The Resource Calendar details such as the custom holidays and leave opted for by a resource can be specified here. In addition, the Resource Shift details can also be specified. To specify the resource holidays, click on the required date on the calendar control. The selected dates are shaded yellow and shown under the Resource Holiday Details heading. The organization holidays can be viewed under the Organization Holiday Details heading but they cannot be changed. To specify the shift for the resource, click on the radio button against the desired shift and then click the Set button.

Alternate Resource Allocation
In the Alternate Resource screen, you can specify an Alternate Resource to whom the activities of any resource should be transferred in the event of his/her absence. You can click the Alternate Resource button at the top of the Activity List screen to view this screen. You can specify the workflow type under which the alternate resource(s) is to be grouped using the Group by Workflow Type drop down. You can choose to group under all workflows or specify a particular workflow. To specify the alternate resource, you can do a resource search using the Select Resource option. Select one of the two options – ID Search or Name Search. Next enter the respective parameter in the data field and click the Submit button. The selected resource details are listed in the table on the lower half of the screen.
Activity Detailed View
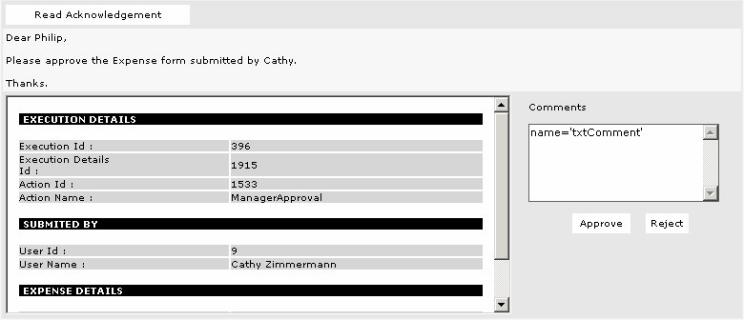
In the Activity Detailed View, you can view the detailed information related to the selected activity and perform necessary actions. You must click on an action to open its detailed view. The detailed view has the Action Type and Subject fields at the top, displaying the corresponding values for the selected activity. It also has the Read Acknowledgement button, which can be used to acknowledge receipt of the activity. This button displays only for activities that require resources to acknowledge.
In addition to the above controls there are a set of controls that are specific to the action assigned in the selected activity. In the image shown above, the activity is an 'approval request'. The Activity Detailed View, therefore, includes the Comment field, where the resource can enter comments for the activity. It also has the Approve and Reject buttons, with which the resource can either approve or reject the request.
The Custom Document View occupies a large area at the lower left of the Activity Detailed View. The application specific details to be shown to the resource in the selected activity, are displayed here. For example, in the Approval action this View shows the details of the approval request. The Custom Document View has to be configured in the WorkflowNET.Config.xml file, using the <documentwebviewcontrol> tag. This allows you to customize the appearance and content of this area to suit the needs of different applications.