The Checklist Action is incorporated in the Skelta
Workflow.NET workflow process design to send questions that need to be answered
by resources. These questions can be sent as Textbox, Memo, Checklist,
Dropdown, and RadioButton.
When a resource has acted upon the checklist, it is marked as completed and the
details are stored in XML format in the database. It can be retrieved as SELECT
SWL.Chardata FROM SWActivityList SW INNER JOIN SWLong SWL ON SW.Data = SWL.Id
WHERE (SW.Id = 299 (ActivityId)). To see a sample checklist, click
here. To see how the details are stored in the database click to view
the xml file.
The Properties to be set for the Checklist action
and the function of the properties are explained in the table below.
|
Property
|
Description
|
|
To
|
This property specifies the resource(s) who have to
take up the Checklist action. It is tagged with the Ignore Unavailable Resources
property which in turn is tagged with Alternate Resource Allowed. This
will be explained in detail later.
|
|
Subject
|
This is the subject of the Checklist. The subject can
be customized for each resource. To assign a subject to the Checklist action,
click the 'Subject' button in the Properties pane for the Checklist
action. A new window pops up. In this window, customize the subject by
appending the various fields to the subject.
|
|
Notes
|
This is the actual content of the Checklist sent to the
resource(s). The notes can be customized for each resource. To assign the
content of the Checklist, click the 'Notes' button in the Properties pane
for the Checklist action. A new window pops up. In this window, customize the
content by appending the various fields to the notes.
|
|
Questions
|
You can define Question and Answer Types in a Checklist
Action; the Answer Types provided are Textbox, Memo, Checklist, Dropdown, and
RadioButton. The attributes of this property are given below.
-
The user interface displays the Question and Answers.
-
Decision Maker functionality.
-
There can be a Decision Maker associated with a Checklist. The outcome of the
Checklist Action is determined by the Answers tagged with the Decision Maker.
Only Dropdowns can have the Decision Making functionality tagged.
-
Whenever a resource acts upon (submits) the checklist the engine is notified
with the answer to the question, provided the question is marked as a decision
maker.
-
Mandatory Functionality.
-
If an answer type is marked as mandatory the resource will be prompted to enter
the value before submission.
-
Default Functionality
-
Inputs given as default will be shown as the default answer for the answer type
in the resource interface.
-
Edit and Delete options have been provided.
-
To add Questions and Answers,
-
First the user clicks on the Add New
button (the option to add more than one question has also been provided.)
-
Then the user is asked to enter the question and the answer type,
-
Based on the answer type the user is asked to enter the values (for example, if
the answer type is Drop Down, the user has to enter "display text" and the
value for the display text.)
|
|
Min. Acknowledgements
|
This property (referred to as Min.Ack), which
can be specified as a number or percentage, is the minimum number of resources
who should acknowledge receipt of the Checklist request. This property is
related to the 'Timeout warning for Acknowledgement' and 'Timeout for
Acknowledgement' properties. To illustrate, when 'Timeout for Acknowledgement'
is reached, the activity first checks if the acknowledgement count is less than
Min.Ack (if it is set). If it is, the activity will be removed from all
activity lists. If the 'Min.Ack' has already been satisfied, then the activity
will be removed from the non-acknowledgers' lists. If the Min.Ack value is 0,
then the activity checks if the acknowledgement count is less than Max.Ack (if
it is set). If it is, the activity will be removed from all activity lists.
Else the activity will be removed from the non-acknowledgers' list. If both
Min.Ack and Max.Ack are set to 0, then there should be at least one
acknowledgement within the set time, otherwise the activity will be removed
from all activity lists.
|
|
Max. Acknowledgements
|
This property (referred to as Max.Ack), which
can be specified as a number or percentage, is the maximum number of resources
who should acknowledge receipt of the Checklist request. If 'Timeout for
Acknowledgement' is specified and achieved, and the 'Min.Ack' is also
satisfied, then the activity waits for action from those who acknowledged. If
the Min.Ack value is set to 0, then it checks if the acknowledgement count is
less than Max.Ack. If it is, the activity will be removed from all activity
lists. Else the activity will be removed from the non-acknowledgers' list. If
both Min.Ack and Max.Ack are set to 0, then there should be at least one
acknowledgement within the set time, otherwise the activity will be removed
from all activity lists.
|
|
Timeout for Acknowledgement
|
This property (referred to as Time For Ack.) specifies the time until
which acknowledgement is allowed i.e. the time until which the Checklist action
will wait for acknowledgement. If Min.Ack is set and is not reached, the
activity is removed from all activity lists. If Min.Ack is 0, it will check if
acknowledgement count is less than Max.Ack. If it is, the activity is removed
from all activity lists. Else the activity will be removed from the
non-acknowledgers' list. The activity will remain in the acknowledgers'
activity list and wait for action from them.
Click here to
view the flowchart for Timeout for Acknowledgement.
|
|
Timeout Warning for Acknowledgement
|
This property (referred to as Time Out Warning For Ack.) specifies the
time at which a warning is provided to a resource to acknowledge the activity
assigned to him/her. If the resource does not acknowledge within this time the
engine is notified with a warning. Thus if 'Min.Ack' is set, and it is not
satisfied before the given time then a warning is sent. If Min.Ack is 0, it
will check for Max.Ack. If the acknowledgement count does not reach the Max.Ack
value within the set time, a warning is sent. If both Min.Ack and Max.Ack are
not set, this property is ignored.
Click here to
view the flowchart for Timeout Warning for Acknowledgement.
|
|
How Acknowledgement Properties
relate to each other:
Checklist action is assigned to the resources in the Checklist list by the
workflow engine. Checklist action has a default property set that at least one
person has to make a Read Acknowledgement (Take Ownership) of the Checklist
action.
A button interface has been provided for the resource to Acknowledge (Take
Ownership). However, the resource can act on the Checklist without
acknowledging first, in which case acknowledgement will be considered to be
done. i.e. if the resource acts upon the Checklist action without
acknowledging, then it is considered as an acknowledgement with action taken.
After the resource has acknowledged, a link is provided to the resource which
opens a pop up with the details of the other resources. This is again tagged
with the 'Hide Responses?' property. The link will be provided only If 'Hide
Responses?' is set as 'No'. The pop up will have details like Resource name,
Acknowledge Status, Action taken, Comments etc.
If the 'Min.Ack' property is set and the acknowledge count has reached the set
limit [percentage or number] then the 'Timeout Warning For.Ack' property is not
considered.
If the 'Min.Ack' property is set and the acknowledge count has reached the set
limit [percentage or number] and the 'Time Out For.Ack' is also reached then
the activity is removed from other resources' task list and the activity waits
for action from those who acknowledged.
If the 'Min.Ack' limit is not reached for the Checklist action, and the
'Timeout Warning For Ack.' has been exceeded then the resource is notified with
a warning by including an email or an information action, with the Timeout
Warning for Acknowledgement link to it.
If 'Timeout For Ack.' is set, if the Checklist action has not reached the
minimum limit (Min.Ack) and the 'Time Out For Ack.' has been reached, then the
activity is removed from the task lists of all the resources.
If 'Min.Ack' = 0 and if 'Max.Ack' is set, the activity waits for
acknowledgement or action until the 'Time Out For Ack.' is reached (if this is
set).
If none of the Acknowledgement properties are set then the activity waits until
the resource acknowledges or acts upon it.
|
|
Affirmative Answer for Checklist Completion [% or
Number]
|
This property is used to check what percentage or
number of persons should take action for Checklist. Decision on the Checklist
is taken only after the specified number or percentage of resource(s) have
taken the action. The activity waits for the resources' action until the
'Timeout for Action' is reached.
|
|
Action Min Limit for Checklist Completion [% or Number]
|
This property specifies the minimum number of resources
to act on the Checklist before the 'Timeout Warning for Action'. If the action
limit is reached before the 'Timeout Warning for Action' then the warning
message is not shown.
|
|
Timeout Warning for Action
|
This property specifies when a reminder has to be
provided for the resources to act on the Checklist, if the action count has not
been reached. If properties such as Max.Ack, Affirmative Action for Checklist
Completion (AAC), and Action Limit (AL) are set, once the property values are
reached then a warning is sent to the participant. When the timeout is reached,
the following checks are made:
if AL is set, when the 'action count' i.e. the no. of Checklist actions (AC)
< AL, then a warning is sent,
if AL = 0 and AAC is set, and when AC < AAC, then a warning is sent to the
participant.
Click here to
view the flowchart for Timeout Warning for Action.
|
|
Timeout for Action
|
This property's value is used to decide until what time
the activity should wait for resource action. If properties such as Max.Ack,
AAC, AL are set, once the property values are reached the activity is removed
from the task lists of all the resources. When the timeout is reached, the
following checks are made:
if AL is set, when the 'action count' i.e. the no. of checklist actions (AC)
< AL, then the timeout for action is performed and the activity is removed
from all activity lists.
if AC > AL, it checks with the 'decision count' (DC) and AAC.
if DC >= AAC (if it is set), the action is considered to be completed.
if AAC = 0 and if DC >= AL, the action is considered to be completed.
if AL = 0 and AC < AAC, then the timeout for action is performed and the
activity is removed from all activity lists.
if AL = 0 and AC > AAC, it will check with DC. If DC > AAC it is
considered to be completed.
if AL = 0 and AAC = 0, then if DC is at least 1, then it is considered to be
completed.
Click here to
view the flowchart for Timeout for Action.
|
|
Hide Responses?
|
If this property is set to 'No', then the resource�s
details will be visible to the resources who have acknowledged.
|
|
Consider only Business Hours for Timeout?
|
If this property is set, all the time out calculations will be done based only
on the business hours, i.e. leaves and organization holidays will not be
considered. Business hours for the Organization and Resource can be set using
the calendar controls (Organization,
Resource)
provided.
|
|
Forwarding Allowed?
|
If this property is set then the resource is provided with a Forward button.
Using this the resource can forward the activity to another resource.
|
|
Ignore Unavailable Resources?
|
If this property is set, when the Checklist action is
assigned to the resources list, a check is first done to see whether the
resource is available. If the resource is not available then a check is made
for an alternate resource assigned to the unavailable resource. Simultaneously
the value of the property 'Alternate Resource Allowed' is checked. If that is
also set, then the Checklist task is assigned to this resource.
|
|
Alternate Resource Allowed?
|
This property is set to assign a particular task to an
alternate resource in the absence or unavailability of any resource.
|
|
Severity
|
This property is set to indicate the severity of the
Checklist. It can be set to 'Low', 'Medium', or 'High'.
|
|
Show Custom Document View Window
|
If this property is set, then the Custom Document View
Window will be shown.
|
|
Send Notification Email
|
If this property is set to 'Yes', then notification
emails will be sent to the resources.
|
|
Multiple TimeOut Warning
|
This is used to set recurring timeout warnings that
will be sent to the resources who have to take action. To set multiple timeout
warnings, click the 'Multiple TimeOut Warning' button in the Properties pane
for the Checklist action. A new window pops up. In this window, set the
interval for the recurring warning as well as the output message.
|
|
Property settings for Checklist
|
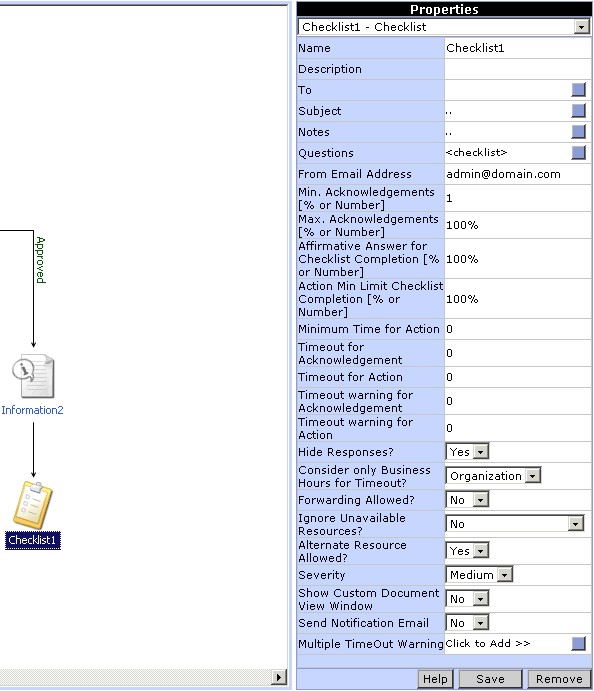
To add the Checklist action to the
workflow click on the Checklist button in the toolbox. An icon for the
Checklist action will be added in the design area. The action can be linked
with the workflow by clicking on the Link button in the tool box. To set the
properties for the Checklist action click on the Checklist icon in the design
area. The properties corresponding to the Checklist action will be displayed in
the Properties pane of the Process Designer.
|
|
| Fig 1. Checklist properties (Top)
|
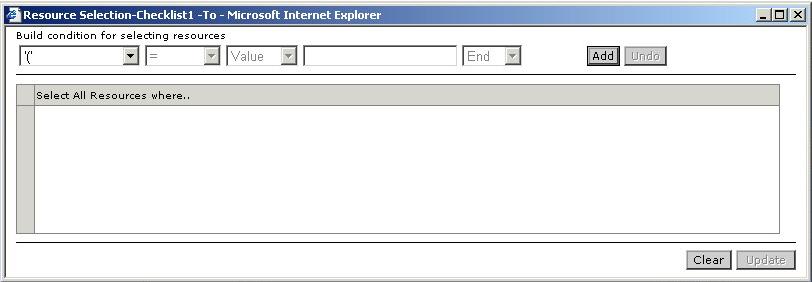
To select the resources to whom this
Checklist is to be sent, click on the button for the 'To' property. A window
pops up (Fig 2.), in which the resources can
be selected. An expression can be built to select the resources based on the
resource properties. Select a property from the list, then select the operator,
type of value (Value, Variable, Content), corresponding value for the property
and the logical operator. Add the condition to the expression by clicking the Add
button. To end the expression select the 'End' instead of a logical operator.
To remove a condition already added to the expression, click the Undo button.
After building the expression, click the Update button.
|
|
| Fig 2. Select resources to whom the Checklist is to be sent (Top)
|
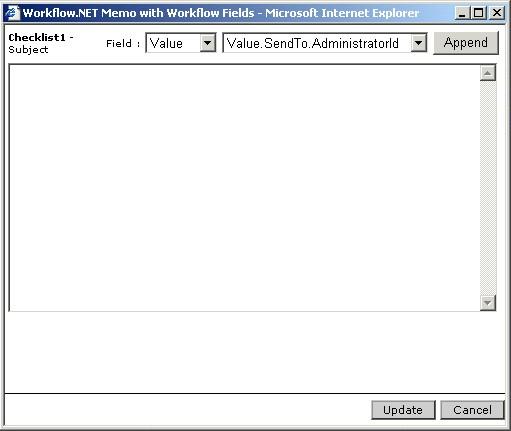
The subject of the Checklist can be
customized. To prepare the Checklist subject, click on the button for the
'Subject' property. A window pops (Fig 3.) up
where the subject can be typed and customized by appending the resource
property values. Click the Update button to save the subject.
|
|
| Fig 3. Subject for the Checklist (Top)
|
|
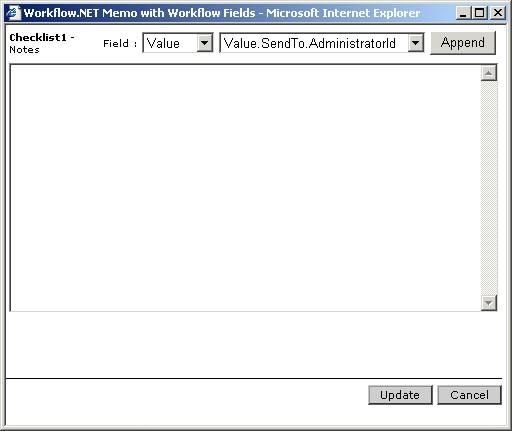
Notes is the content of the
Checklist. To prepare the notes, click on the button for the 'Notes' property.
A window pops (Fig 4.) up where the notes can be
typed and customized by appending the resource property values. Click the Update
button to save the notes.
|
|
| Fig 4. Notes for the Checklist (Top)
|
|
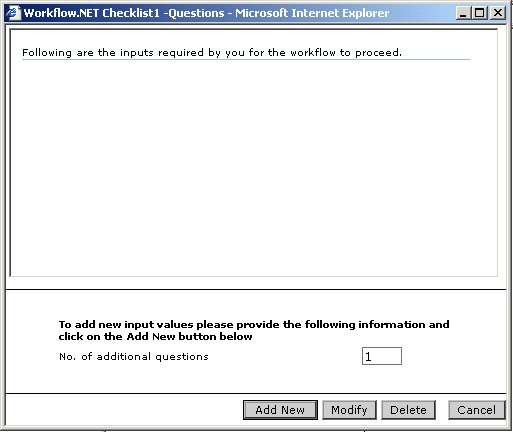
Questions
Property in Checklist Action provides the interface to add Questions and
Answers. The functionality of the Checklist Action is achieved through this
property. A Question marked as ! is said to be
the 'decision maker' for the Checklist action. There can be only one 'decision
maker' for a checklist action. The outcome of the checklist action is notified
to the Workflow engine through the 'decision maker' functionality. Only
Dropdowns can be set as 'decision makers'. For example, if the decision maker
is tagged with a Question which has 'Approved' & 'Rejected' as values, and the
checklist is submitted with 'Approved' selected in the dropdown, then the
engine is alerted about the 'Approved' status and the engine executes the next
process in the workflow. A Question marked as *
is set as 'mandatory' when the resource fills up the Checklist. The resource
cannot submit the checklist answers without filling the 'mandatory' questions.
There is also a provision to add 'default' values, the values added as
'default' will be displayed when the resource views the Checklist.
The interface shown in Fig
5 is to Add, Edit and View the Questions and Answers added in the
Checklist action.
|
|
| Fig 5. Checklist - Listing of Questions,Answers,Decision Maker,Mandatory
Questions. (Top)
|
|
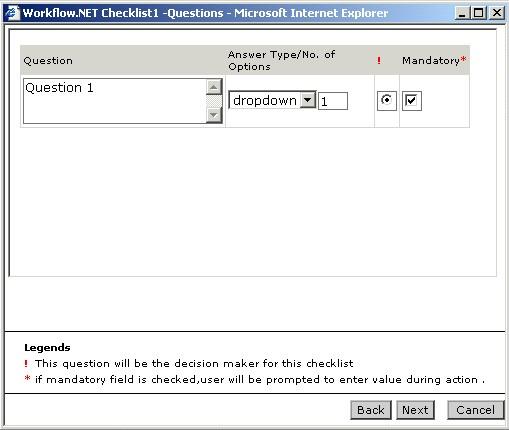
The interface shown below is the
second step for adding a Checklist. This interface is displayed after the user
selects Add New or Modify from the interface shown in
Fig 5. The following parameters can be set here
Question Name and Answer Types.
Question to be Decision Maker or not.
Question to be Mandatory or not.
|
|
| Fig 5.1 Checklist - Add Questions and Question Type, Set Decision Maker &
Mandatory Options (Top)
|
|
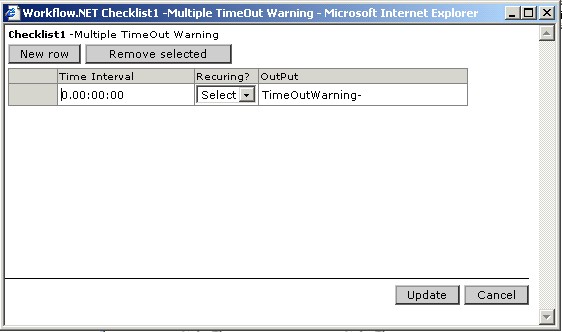
Multiple TimeOut Warnings are
repeated warnings sent to the resources regarding timeout of the Checklist. To
set multiple timeout warnings, click on the button for the 'Multiple TimeOut
Warning' property. A window pops (Fig 6) up where
the Time Interval can be typed and the Recurring? option set to 'Yes'. The
output message can also be typed here. More than one timeout warning can be set
by clicking the New row button and entering the new timeout warning
settings. Click the Update button to save the settings.
|
|
| Fig 6. Multiple TimeOut Warning for the Checklist (Top)
|